I’ve always wanted one of these so I built one.
Until then, I never realized how great sounding and versatile this amp is. It’s now a studio staple. We use it for everything; bass, guitar, organ, DI.
In many ways, it’s the sound of rock and roll. It’s Bootsy Collins, Phil Lesh, Jerry Garcia, David Gilmour, and Stanley Clarke in a box.
The circuit for this preamp has been around forever. When Leo Fender wanted to build an amp, he turned to the RCA Tube Manual of 1944.
Following this inspiration, the folks at Alembic stepped in to build the F-2B. You’ll find the same circuit on almost every Fender amp ever made.
Given its time-worn simplicity, it’s surprising there can be any improvements to be made. There can.
Add a high quality, low-noise toroidal power supply, a well designed White cathode follower tube stage, transformer balanced line level outputs, and use the highest quality components possible.
I’m inclined to think the Alembic builds begin to look a little flimsy in comparison.
Jon Fleig demonstrated this with his build, documented at http://www.frontiernet.net/~jff/SonOfAlembic/SonOfAlembicF2B.html
Except for a few points, his documentation is stellar and his vision was essential for my build. Aside from a few small changes, my build closely follows his work.
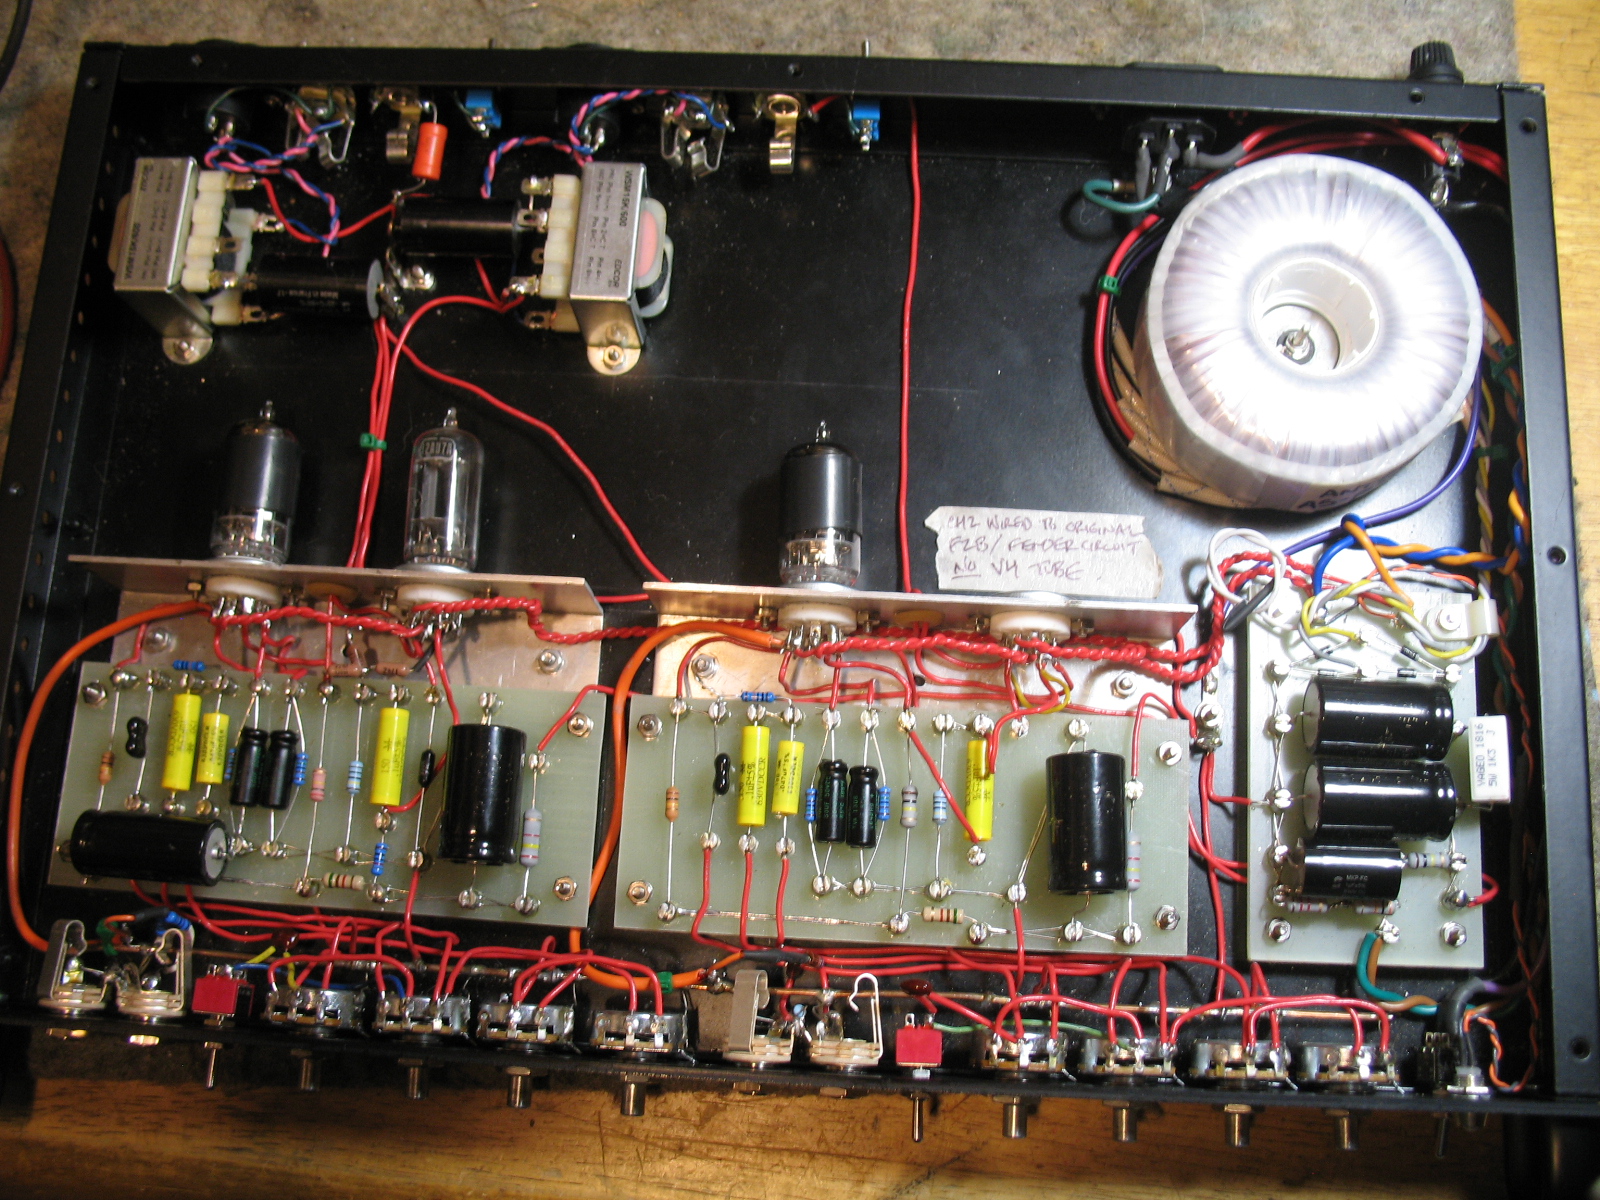
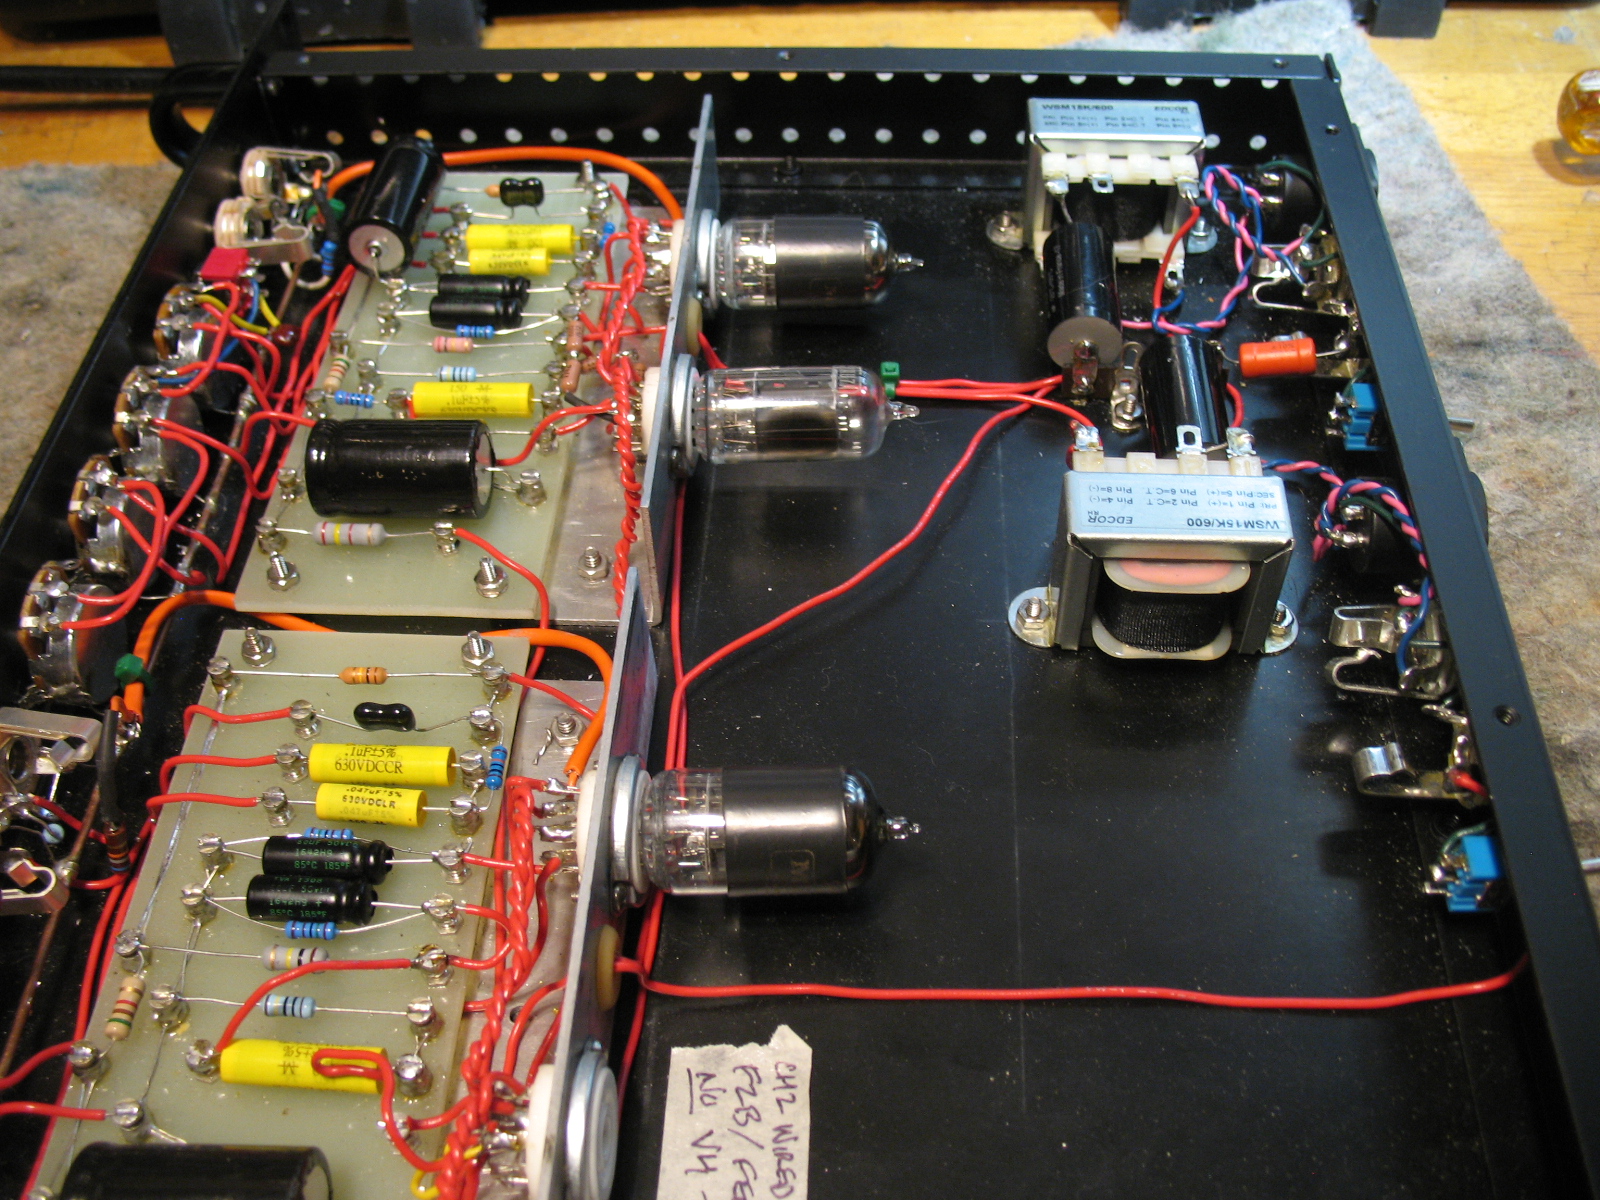
Alembic F-2b Inspired Clone Gutshot
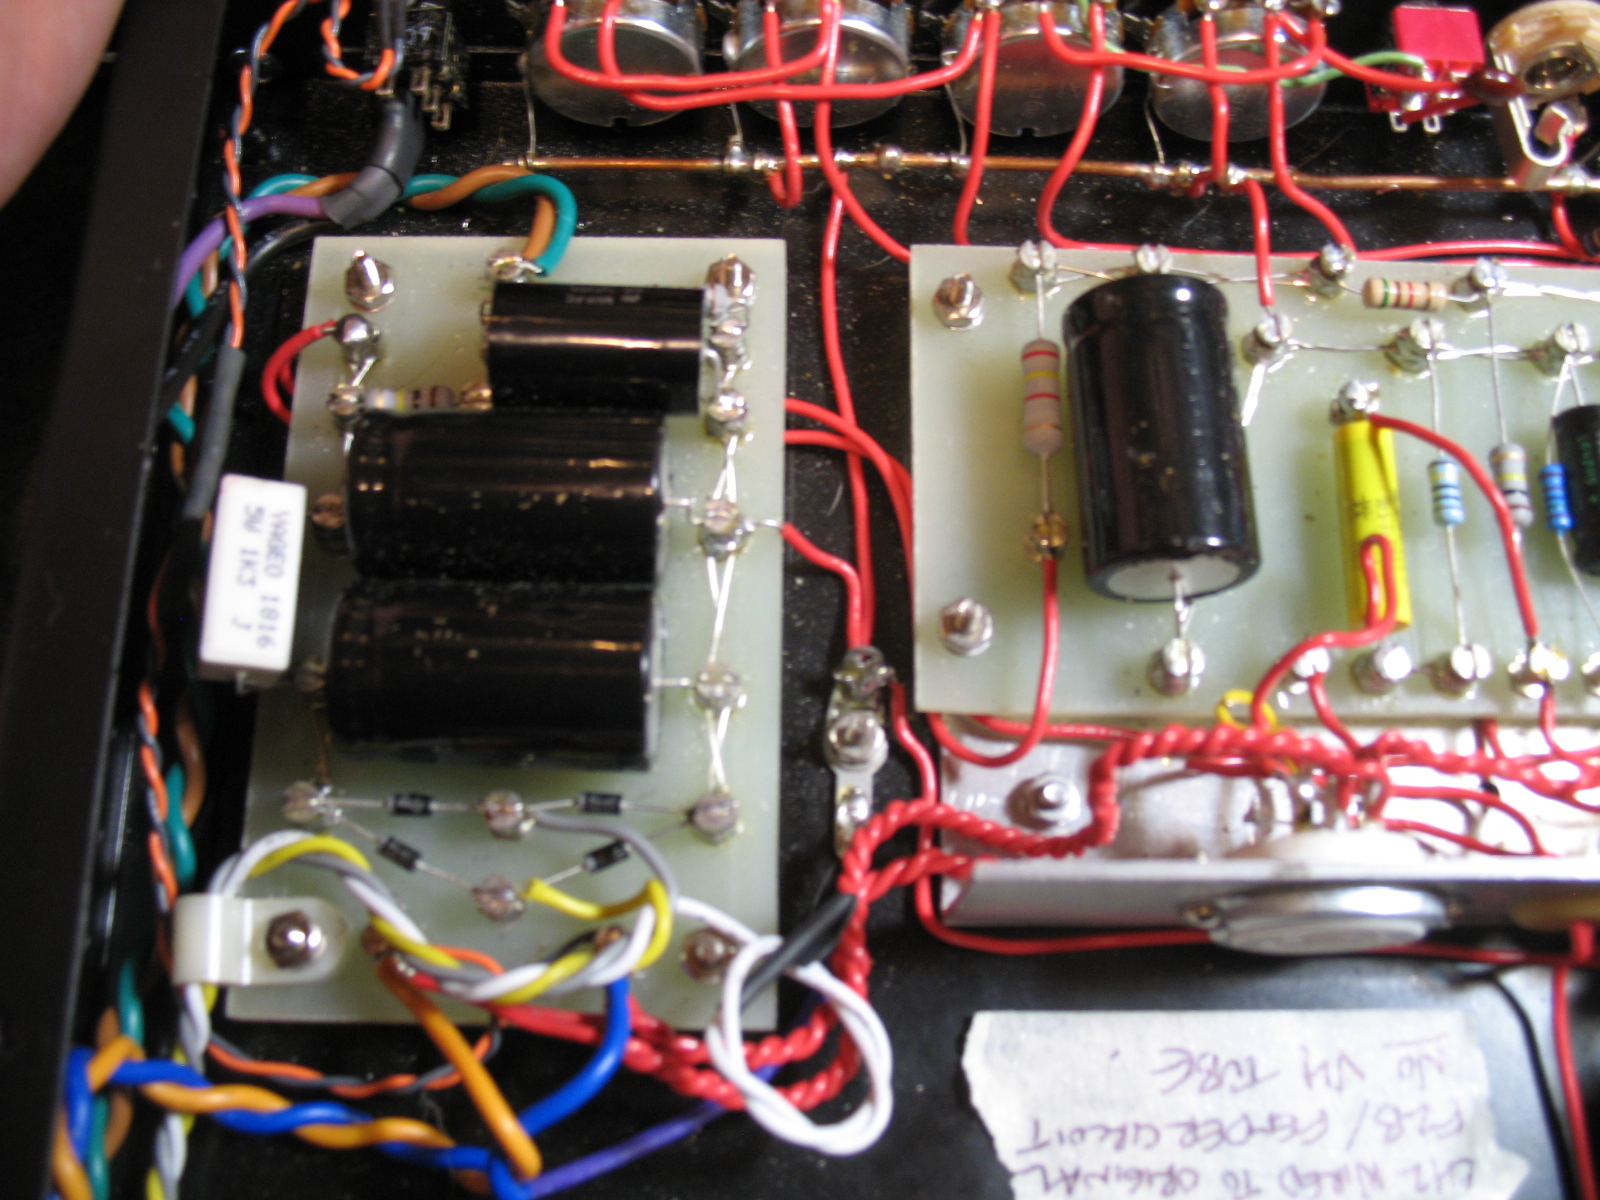
The boards were made up using G-10 glass epoxy boards with the Visio templates that Jon Fleig supplied as a baseline. In his documentation, he notes that some alterations might be necessary due to variations in component sizing and changes in circuit design. I feel it is important to reiterate this point since I wound up making several changes, especially regarding the power supply. My layout can be noted both in the photos and, to a degree, on the schematic. A wet tile saw was used to cleanly cut the boards but the board can be ordered pre-cut. I opted to cut my boards larger than the templates. I located some screw-on turret lugs which I found relatively easy to work with and eliminated the need for turret tools. Throughout the project, I found myself grateful for my trusty drill press and a decent selection of bits.
I scratched my head for a while over the input transformer mounting, eventually unconventionally opting to use the tapered cap from a mouthwash bottle and a few washers to secure it.
Other variations in the layout included output transformer positioning, the use of a few terminal strips, and the spacing of pots, jacks, knobs, etc.
As for the circuit itself…
Note that I’m still in the process of checking the following schematics for mistakes
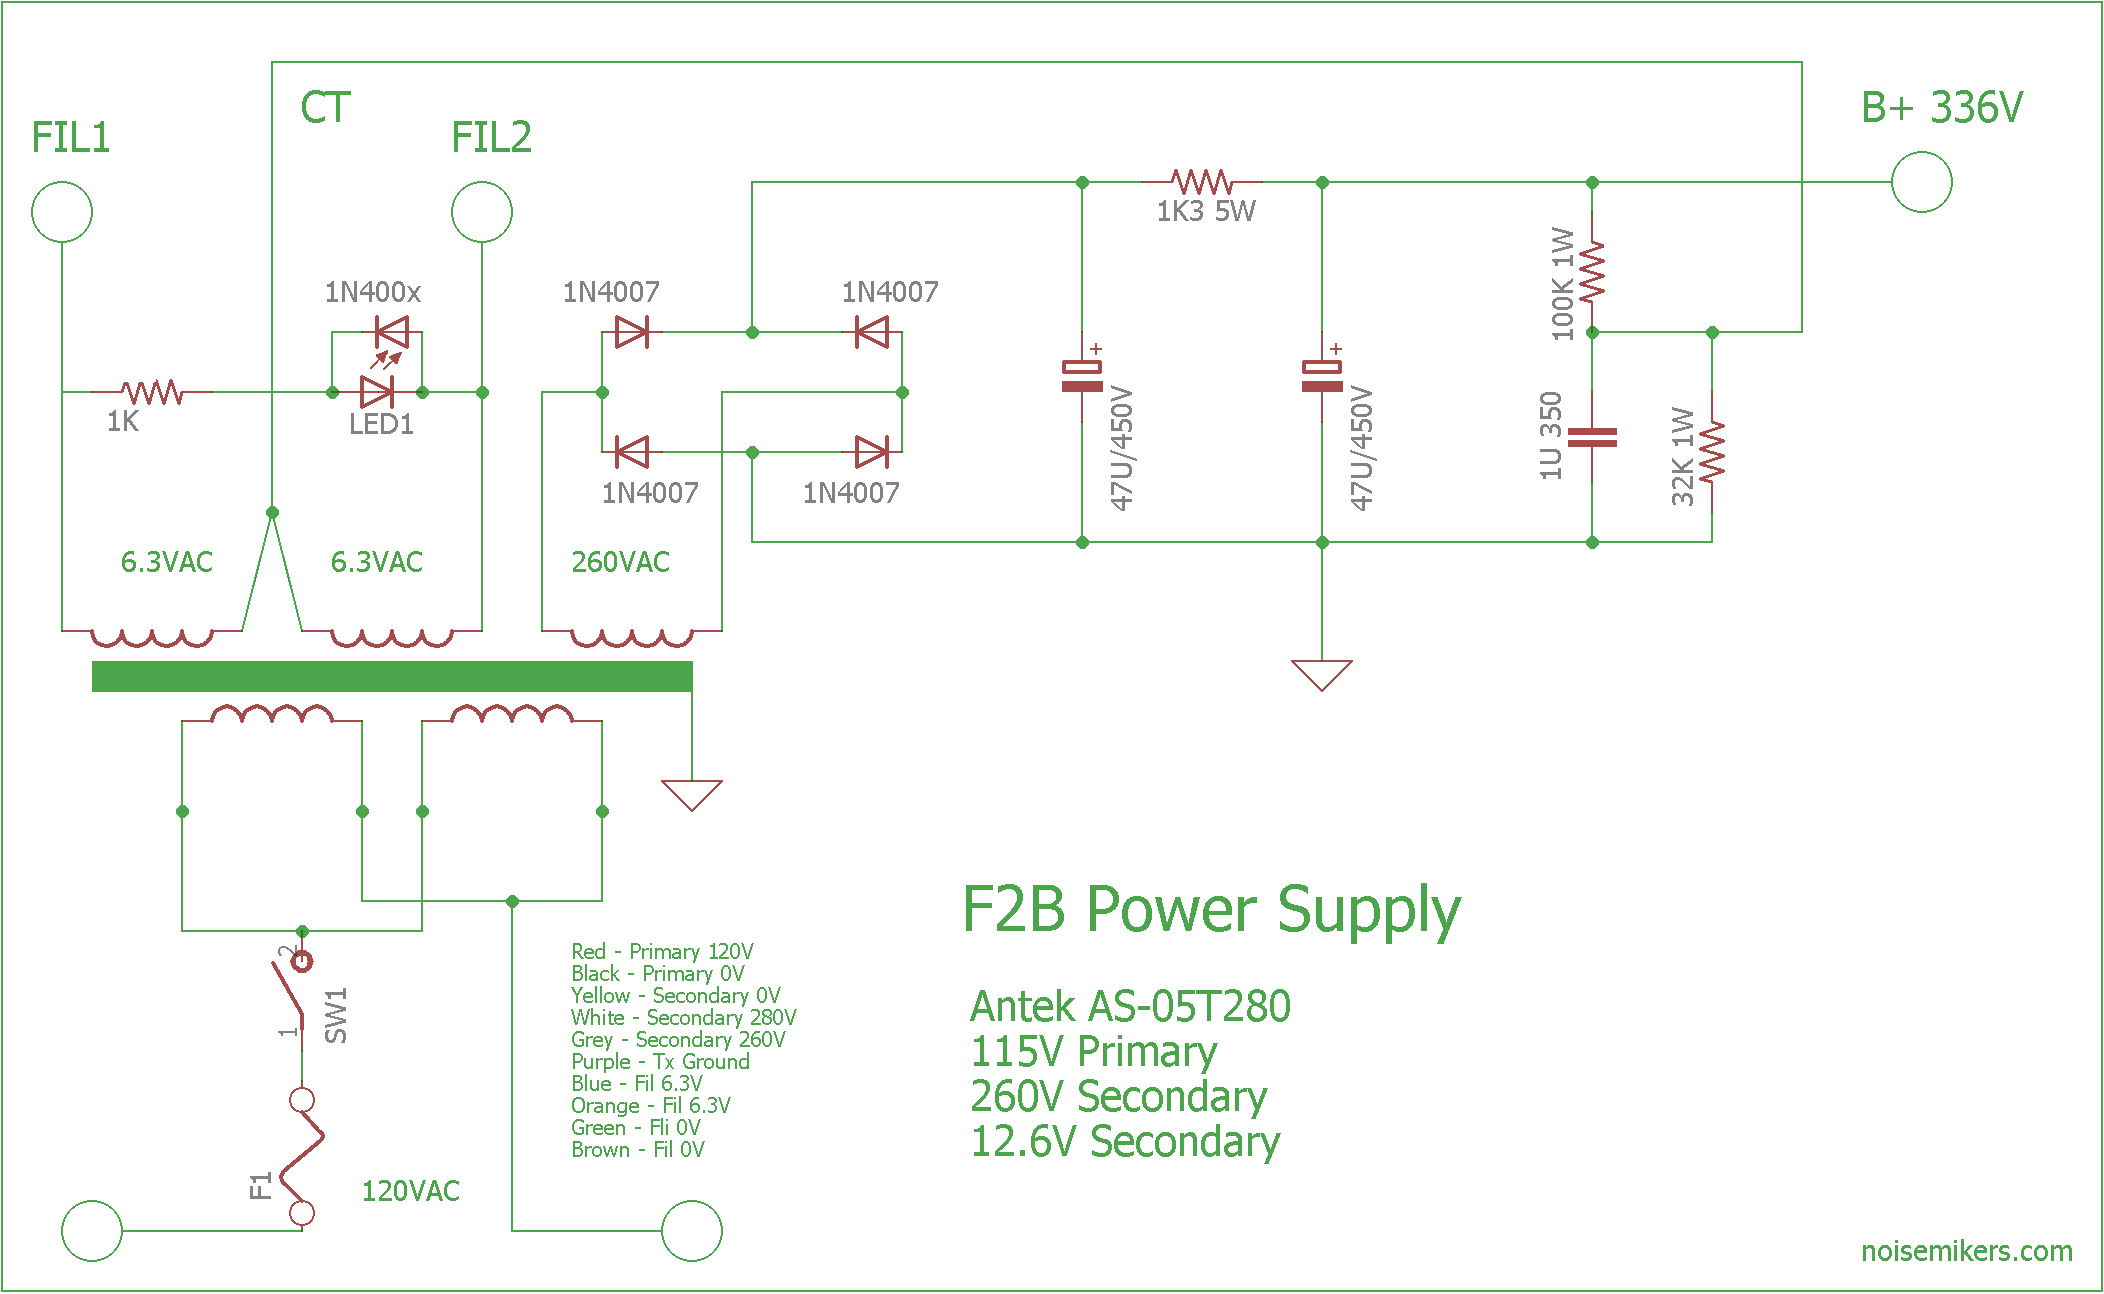
Here’s a DRAFT schematic of the power supply section.
The center tap of the filament secondaries ties to an elevated (81.5v) ground point on the voltage divider across the B+ supply. Fleig touches on the relevance of this on his page. The voltage divider is smoothed by a 1UF film capacitor. This can be polarized and anything up to 10UF should work. Heaters filaments are wired in series for 12.6 volts AC. Rectification isn’t required. Following careful tube amp wiring practices, the heater circuit is relatively noiseless.
With a few variations, Channel 1 of my preamp is pretty much straight out of Fleig’s design. Preamp boards, pots, and input jacks ground to a floating buss bar running parallel to the pots. This buss connects to chassis only at the star ground. Shielded wire, with one end grounded at the buss, connect the input jacks to the grids. The buss bar, power supply, and transformers centrally ground to chassis at the star ground. The output transformer ground connection was used as a grounding point for the isolated output jacks. A ground lift along with an unbalanced high impedance output was added for versatility.
Here’s a DRAFT of Channel 1
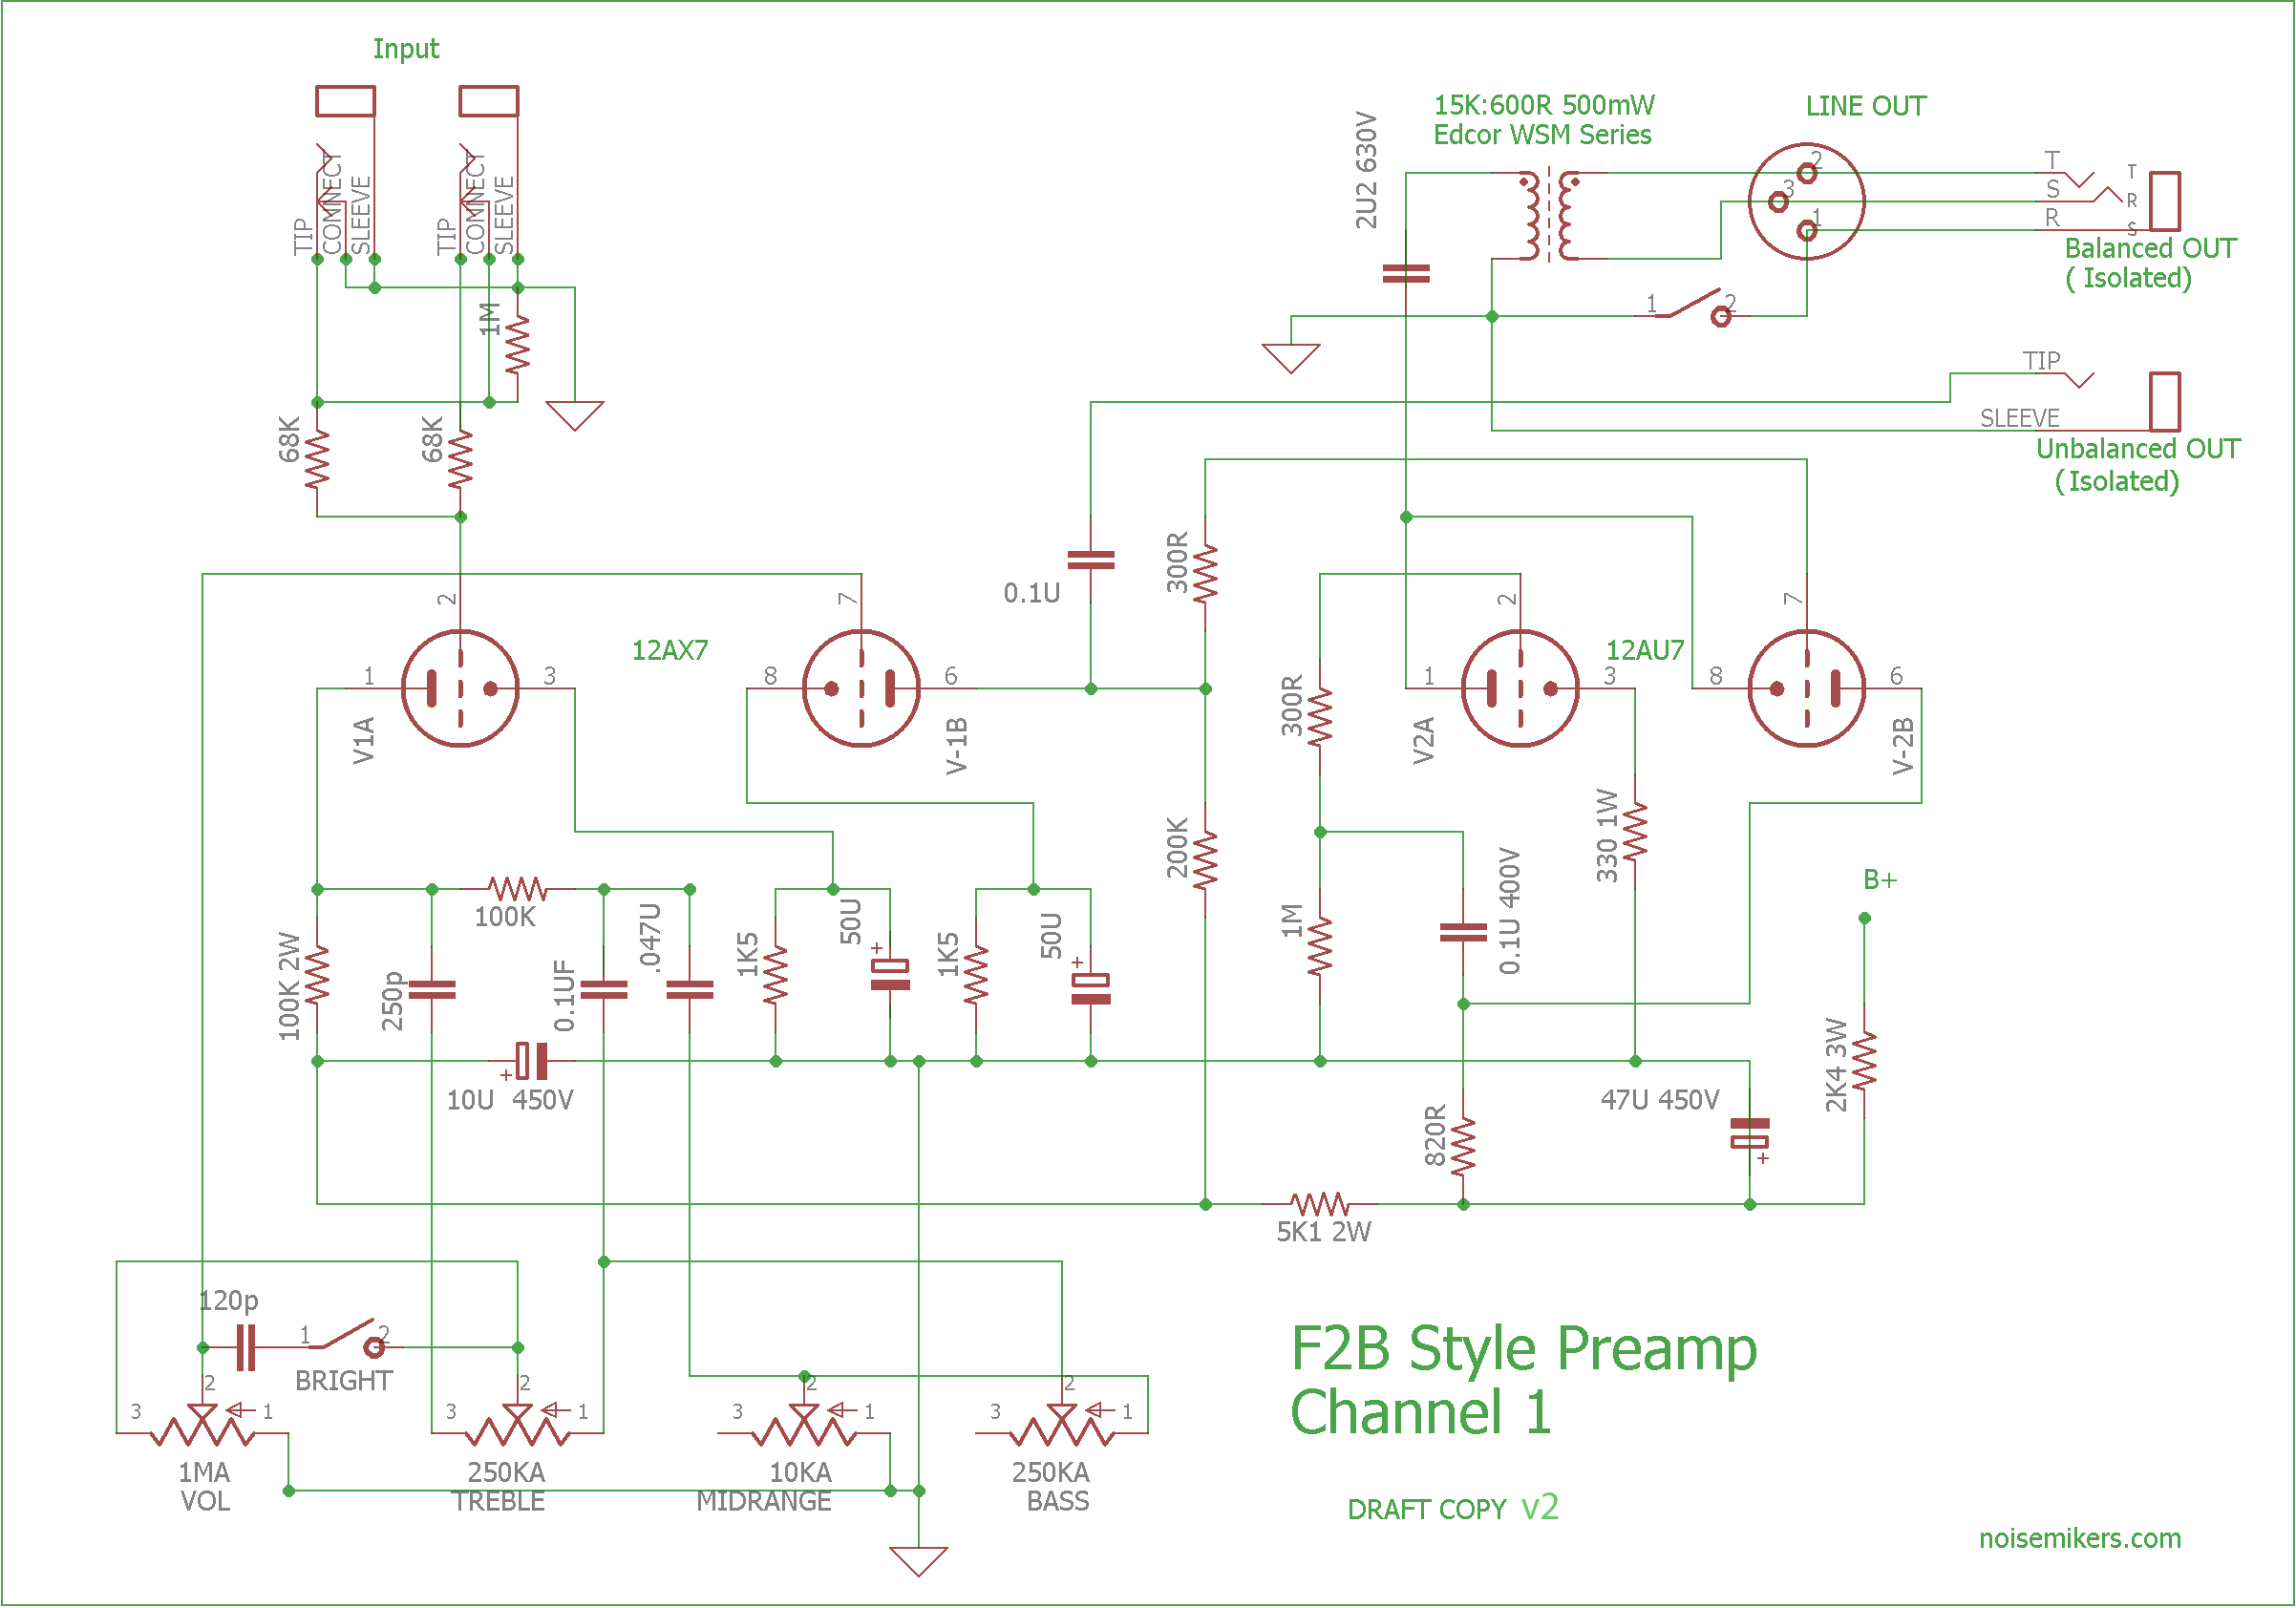
Channel 1 has been used primarily with bass and organ, feeding the balanced outputs simultaneously to power amp and console with exceptional results. As a DI or Leslie preamp, it cannot be beat.
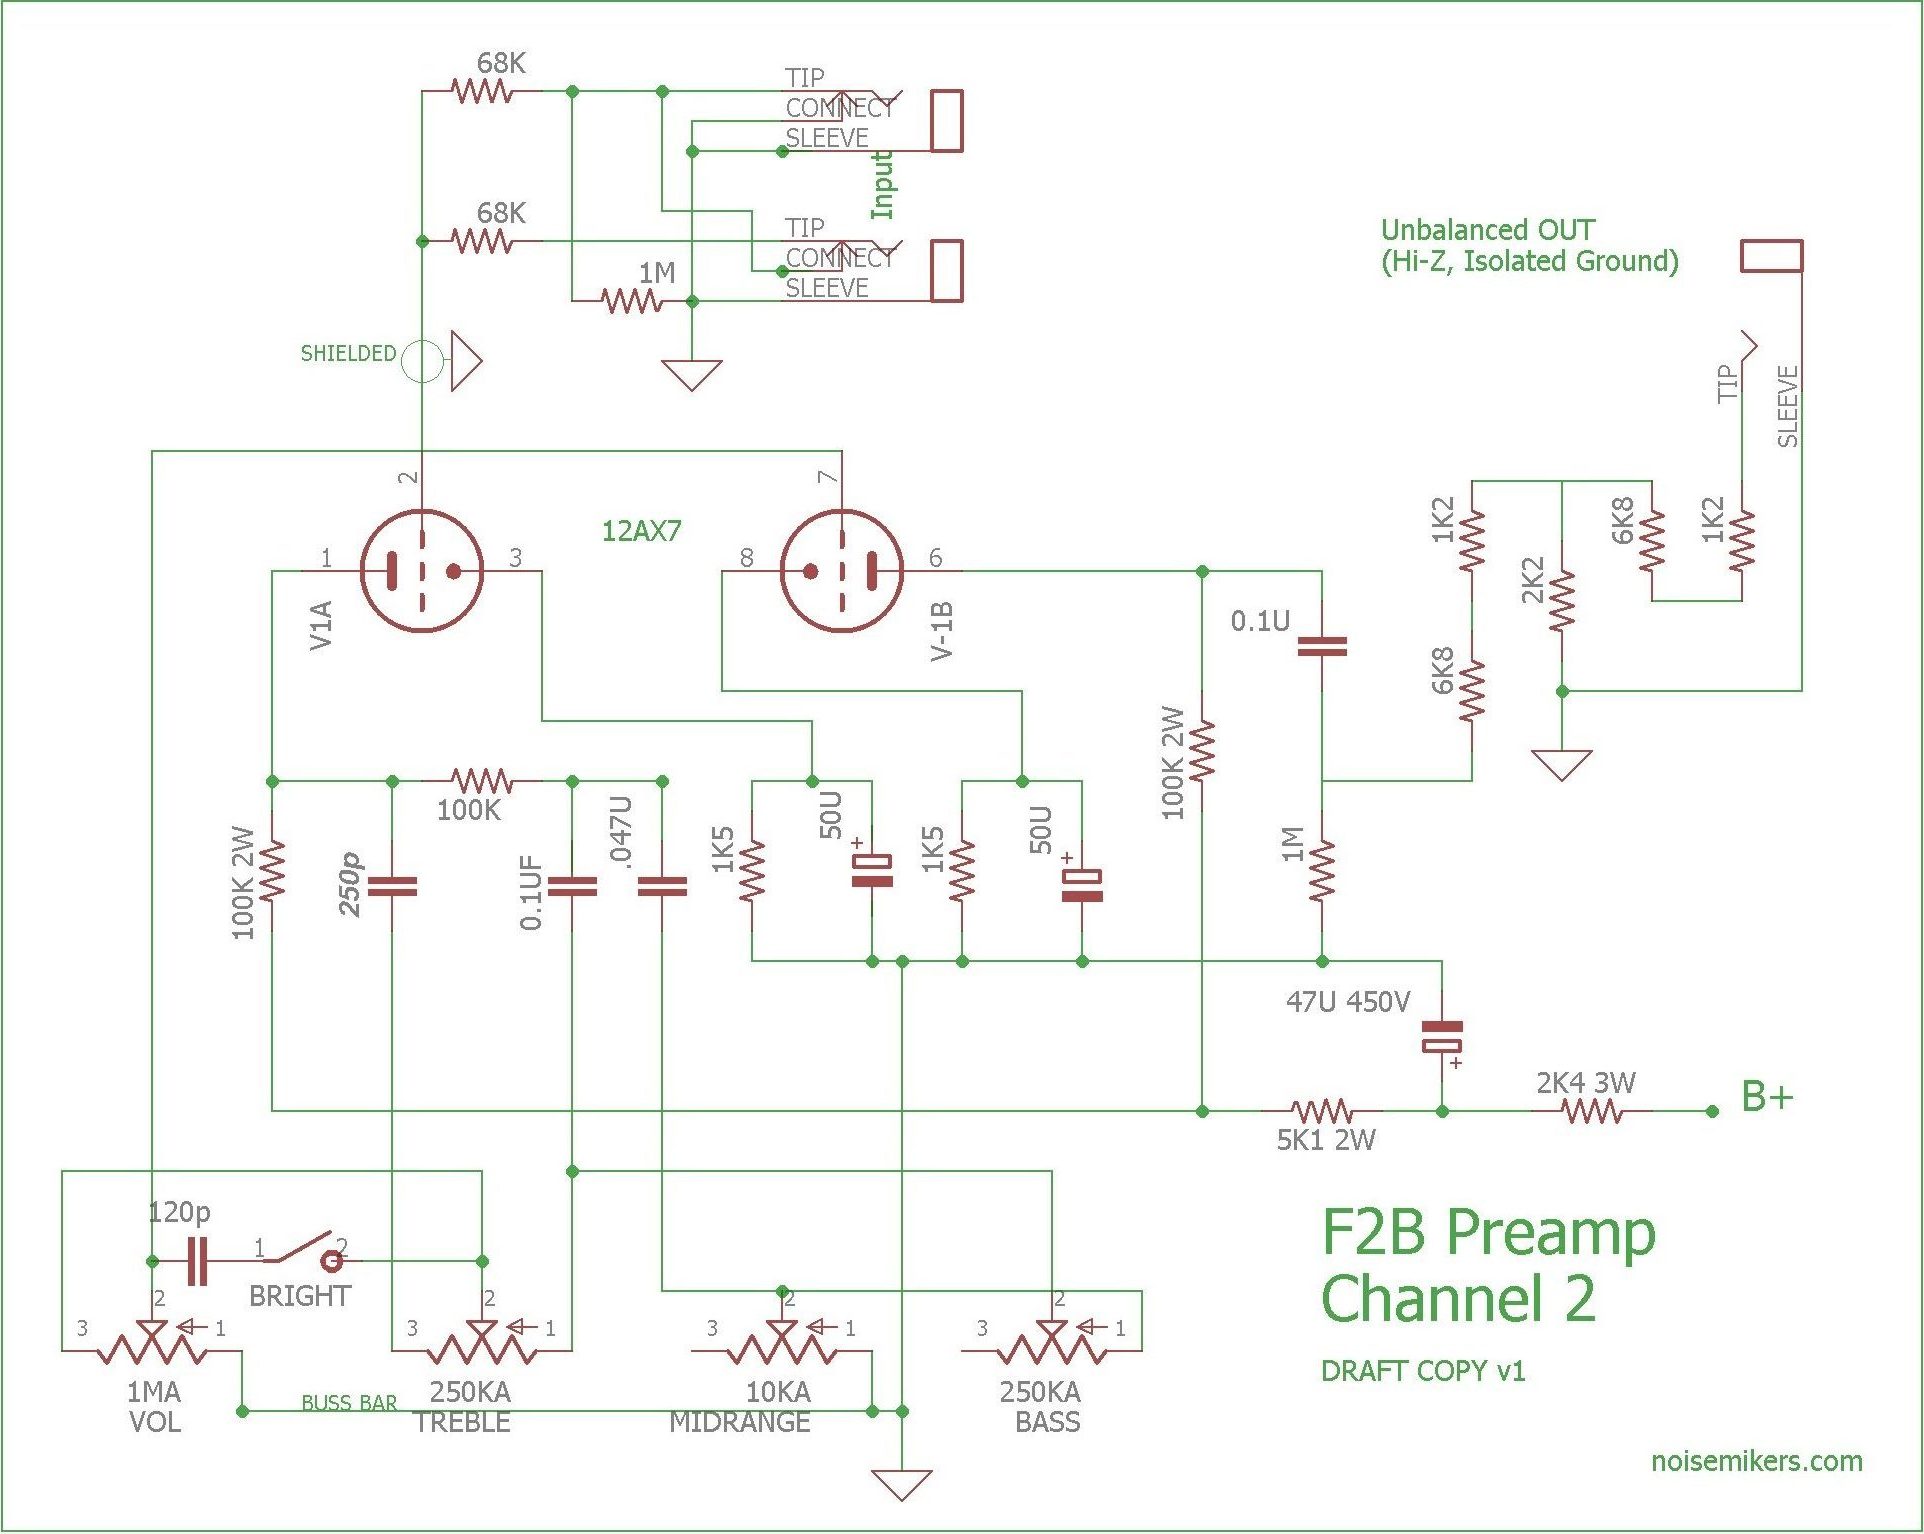
Channel 2 has found its use for guitar. With one notable exception, it reverts back to the original unbalanced Fender/Alembic circuit This preamp, which originally boasted too much gain, was only usable at very low volume settings when coupled with guitar amplifiers. The addition of a simple impedance matched -19dB attenuation circuit to the output provided the perfect amount of reach to the controls. It’s now capable of being pushed hard into classic tube distortion without over-driving whatever it’s plugged into while remaining sparking clean throughout most of it’s range.
Here’s a DRAFT of Channel 2
This has been a fun build with some surprisingly good results. These types of circuits are not only rewarding to build, they lend themselves to the possibility of extensive modification.
Future revisions could include:
Ampeg, Marshall, or other preamp boards
Impedance matched attenuation circuit for Ch.1’s unbalanced output similar to that on channel 2
High cut filter
Buffered effects loop
Tone stack mods
Microphone or line level inputs.
The schematics you see here are subject to revision and will be updated as changes occur.